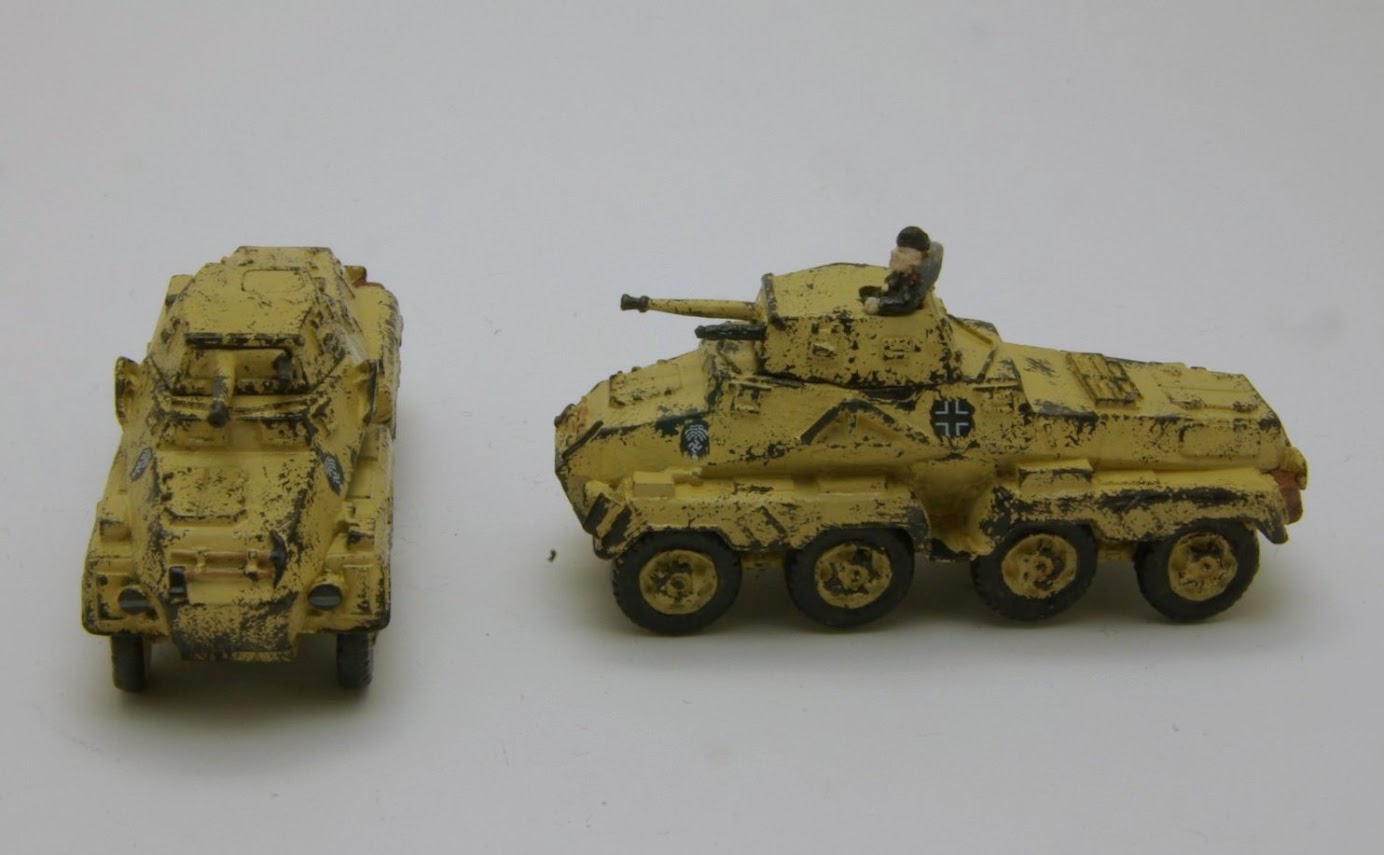
Here is the final result that is achieved by this tutorial.

I mainly use Valeo paints and will only give there colored names but I there should not be any problem to switch to other brands. For this tutorial will I use my recon vehicle Sd kfz 231 or more famous name 8-rad. I would imagine that at have taken me roughly 4 hours to complete them but that include time for paint to dry and shoot the pictures.
1. Assembling and clean the models.
Not much to say. Assemble your models and remove all the casting lines. I also add magnets for the fiddly turrets
2. Spray coat:
Desert Yellow from Army paint.
3. Base coat:
50% Valeo Desert Yellow 50% Pale sand thin with 50% water. Use a big brush and cover the hole model.

4. Sponge time.
Here is 50% of the final result is made. What I do that I use a sponge that come with the blisters from the manufacturer. Rip it slightly so I get and edge. Dip the sponge in slightly diluted paint dab the excess paint of and then sponge the edges of the vehicle. The effect I am after is that the top paint is worn of on the edges and other exposed areas. As I mentioned earlier is that the base base colour of the vehicle is dark grey do I use German grey from Valeo for this work. I have also found for 15mm size is it good to over exaggerate that will pick out the details more.


5. Detail painting.
Here is quick guide to what coloureds I use for different areas:
Guns, tiers, metalparts, crew uniforms - Valeo German grey
Tracks, exhausts - Mahogany sand (dark brown/red colour)
Skin - Valeo Basic skintone
Wood parts, craters - Cork brown
I also add german grey where the decals/marking will be. This is to give the impression that they where there before they repainted the vehicle. Here is the result after this step:

6. Gloss Varnish.
Before I add any wash or decals do I always give a coat of gloss varnish. I do with a brush to get a good even cover. The gloss varnish will help when you add the decals to give a smooth surface to attach them to. It makes it easier to remove any air pockets under the decals. The gloss varnish also helps when you put the wash on. It makes the wash to go for the crevices instead of pool up on the flat surfaces. It also make the paint stick harder which is a bonus.
7. Decals.
I use DAK deacals from Dom Skeleton (www.domsdecals.com) and use Valeo Decal fix to smoothen out the edge.
8. Wash
I use 50-70% thinned Citadel Devlan Mud wash. I use it on all the model and go heavy on the tiers. Here is where the gloss varnish really works you will get allot less pooling on the flat surfaces. Remove any pools on the flat surfaces sins it will cause dark rings.

9. Pigments.
I use pigments to give the dusty and muddy effect. For this model and the desert arena so I use Valeo Humbre pigment. To put it on do I use a good grade of thinner to make a slurry. I apply the slurry with a size 0 brush on the tiers and the lower area where the dust will pick up.
I let the thinner evaporate and I will have a good coat of pigment. I brush of where it is to much and fixate the remaining pigment with MIG pigment fixer. Now are the model nearly done only mat varnish is remaining.

10. Matt Varnish.
For sealing coat do I use matt Varnish from Army painter. I am not 100% happy with it but that was what I had at home. I prefer Valeo matt varnish but it is not always in stock at my LFG. The matt varnish will remove parts of the pigment effect but I think it make the figure nicer.
So there you go. This is my latest way of painting German desert them figures. I hope that you learned some thing under the way. My best tipp is to use Wash and use a gloss coat before you use the wash.
1 comment:
They look fantastic, great tutorial as well :-)
Post a Comment